
Correct Pencil Grasp Visual Schedule
Building a comfortable, functional pencil grasp early makes handwriting far less tiring and frustrating later on. This free visual schedule breaks the grasp down into 7 precise steps — from picking up the pencil to tucking the ring and pinky fingers into the palm.
At a Glance
- What it is: A free, 7-step printable visual schedule for teaching a correct tripod pencil grasp.
- Who it's for: Children who are ready to refine their grip, often after some crayon-holding experience.
- What you get: A full-resolution PDF chart, emailed instantly.
- How to use it: Practice one small adjustment at a time rather than trying to correct the whole grip at once.
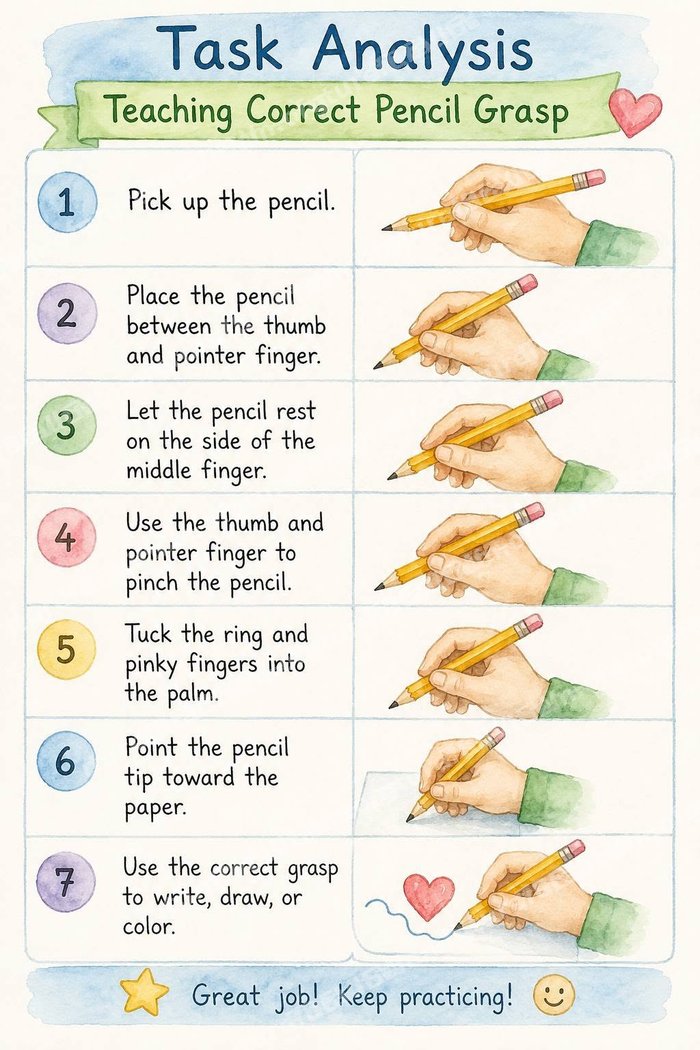
Preview of the printable chart — download the full-resolution, watermark-free PDF below.
What's in this guide
- Why a visual schedule helps
- What you'll get in the free PDF
- How to use it
- What If My Child's Hand Is Too Small or the Grip Feels Uncomfortable?
- Frequently asked questions
Why a Visual Schedule Helps
A pencil grasp is a precise, multi-finger coordination task, and an inefficient grip learned early can be genuinely tiring to unlearn later. Spelling out exactly where the pencil rests — between thumb and pointer, against the side of the middle finger, with the ring and pinky tucked in — gives your child a concrete target to work toward rather than a vague instruction to “hold it right.”
What You'll Get in the Free PDF
A single-page, 7-step visual task analysis:
- Pick up the pencil
- Place the pencil between the thumb and pointer finger
- Let the pencil rest on the side of the middle finger
- Use the thumb and pointer finger to pinch the pencil
- Tuck the ring and pinky fingers into the palm
- Point the pencil tip toward the paper
- Use the correct grasp to write, draw, or color
Get the Free Correct Pencil Grasp Visual Schedule PDF
Enter your details below and we'll email the printable PDF to you instantly.
How to Use It
Work on one piece of the grip at a time rather than correcting everything at once — for example, focus first on tucking the ring and pinky fingers in, then on the thumb-and-pointer pinch. Short, frequent practice during drawing or coloring (rather than formal handwriting practice) keeps it low-pressure while the grip becomes automatic.
What If My Child's Hand Is Too Small or the Grip Feels Uncomfortable?
A pencil grip accessory or a shorter, triangular pencil can make the tripod position more comfortable for smaller hands. If your child has already built a strong habit with a different grip, expect this to take patient, gradual practice — and if progress stalls, an occupational therapist can assess whether a different support or grip variation suits your child better.
Frequently Asked Questions
Is the tripod grasp the only 'correct' grip?
The tripod grasp (thumb and pointer pinching, resting on the middle finger) is the most commonly taught functional grip, though some children do well with a close variation — what matters most is a grip that's comfortable and doesn't tire the hand quickly.
At what age should a child learn this?
This typically comes after some experience holding crayons more loosely, covered in our separate Holding a Crayon guide — there's no single fixed age, as hand development varies by child.
Should I correct my child's grip every time I see it slip?
Gentle, occasional reminders work better than correcting every single instance, which can make writing feel stressful — focus corrections on dedicated practice time instead.